Basic Struts 2 project setup
This tutorial will tell you how to setup a basic Struts 2 project. The IDE I used is Netbeans 6.9, but you could also use any other IDE of your choice. I have tested this tutorial on Glassfish 3.0.1 - a great Java EE 6 certified application server. You should also be able to make this tutorial run on any other Servlet container, such as Tomcat or Jetty. I tested this tutorial on both Glassfish and Tomcat. Apache Struts 2 requires:
- Servlet API 2.4
- JSP API 2.0
- Java 5
Table of contents:
- Getting the Struts 2 libraries
- Creating the web.xml
- Creating the struts.xml
- Creating the struts.properties
- log4j configuration
- Internationalization / i18n
- Creating the struts results (jsp)
- Implementing the Action Class
- Location of the required files
- Running the application
- Download Source Code
The application we will develop is very simple. It consists of two jsp files. One of them displays a html form with only one text field. This text field has to be filled with a message of your choice. On submission the message will be displayed. Our Action class will check if the field is filled or not. In case it is not filled we will get back to the input page and an error message is displayed.
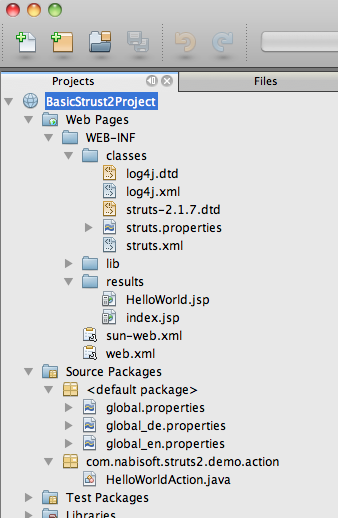
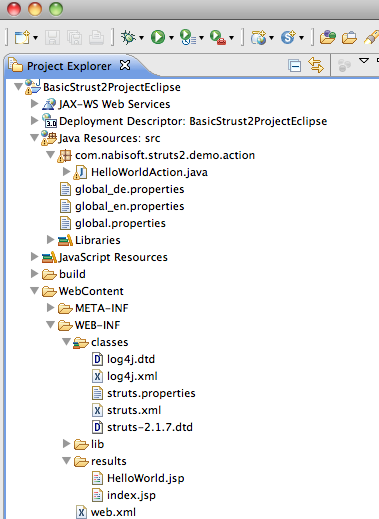
You can also download the Netbeans project (Glassfish) or the corresponding Eclipse project (Tomcat 7). The projects also contain the required libraries in the right place. In both cases the lib directory within WEB-INF contains all the jar files I have mentioned above. In Eclipse these jar files are automatically added to the project (because they are located in the lib directory). For Netbeans each of the jar files in the lib directory has to be added manually to the project (I suggest as a relative path). The following two screenshots show you both the Netbeans (left) and Eclipse (right) project structure:


Creating this tutorial meant a lot of effort. I hope it will help others. Any feedback is welcome - feel free to leave a comment (see below). If you have any questions do not hesitate to contact me. For helping me to maintain my tutorials any donation is welcome.
If you want to learn more about Struts 2 then you should definitely have a look at the examples posted on the official Struts 2 sites at http://struts.apache.org/2.2.1.1/docs/getting-started.html. For this tutorial I have used a lot of the code posted there. The Struts 2 documentation and code examples make a great job for delivering knowledge to beginners and professionals. I am sure they welcome any contribution and donations as well.
1. Getting the Struts 2 libraries
You can download Struts 2 from http://struts.apache.org/index.html (I used struts-2.2.1.1 here). Once you have downloaded the archive please have a look at the lib folder - it includes all the relevent Struts 2 libraries. But we do not want to add all the jar files to our project because we don't need them all.
Unfortunately the Struts 2 downloads for some reason miss the javassist library - I cannot tell you why. That means you have to download it manually as well from www.javassist.org. The download includes javassist-x.xx.x-GA.jar (in my case javassist-3.14.0-GA.jar). If you don't add this library to your project then your Struts 2 application won't run.
Since we will also add log4j support later we have to add the log4j library as well. You can get log4j from http://logging.apache.org/log4j/1.2/.
So finally we have the libraries we want to add to our project. This is the minimum setup for any Struts 2 project:
- commons-fileupload-1.2.1.jar
- commons-io-1.3.2.jar
- commons-logging-1.0.4.jar
- ognl-3.0.jar
- commons-logging-api-1.1.jar
- struts2-core-2.2.1.1.jar
- freemarker-2.3.16.jar
- xwork-core-2.2.1.1.jar
- javassist-3.14.0-GA.jar
- log4j-1.2.16.jar
2. Creating the web.xml
The web.xml is pretty streight forward. The following web.xml has to be placed as usual into your WEB-INF directory:
<?xml version="1.0" encoding="UTF-8"?>

<web-app id="WebApp_ID" version="3.0"
    xmlns="http://java.sun.com/xml/ns/javaee"
    xmlns:xsi="http://www.w3.org/2001/XMLSchema-instance"
    xsi:schemaLocation="http://java.sun.com/xml/ns/javaee http://java.sun.com/xml/ns/javaee/web-app_3_0.xsd">

    <display-name>Basic Strust 2 Project setup on Glassfish 3.0.1</display-name>

    <filter>
        <filter-name>struts2</filter-name>
        <filter-class>org.apache.struts2.dispatcher.ng.filter.StrutsPrepareAndExecuteFilter</filter-class>
    </filter>

    <filter-mapping>
        <filter-name>struts2</filter-name>
        <url-pattern>/*</url-pattern>
    </filter-mapping>

</web-app>
3. Creating the struts.xml
Hint: I guess the Struts 2 developers always forget to offer a new *.dtd file which contains the latest version number (I have monitored this the last releases). But struts-2.1.7.dtd works just fine.
<?xml version="1.0" encoding="UTF-8"?>
<!DOCTYPE struts PUBLIC
    "-//Apache Software Foundation//DTD Struts Configuration 2.1.7//EN"
    "/WEB-INF/classes/struts-2.1.7.dtd">

<struts>
    <!--
    You could also set the constants in the struts.properties file
    placed in the same directory as struts.xml
    -->
    <constant name="struts.devMode" value="true" />

    <package name="basicstruts2" extends="struts-default" namespace="/">

        <!--
        If no class attribute is specified the framework will assume success and
        render the result index.jsp
        If no name value for the result node is specified the success value is the default
        -->
        <action name="index">
            <result>/WEB-INF/results/index.jsp</result>
        </action>

        <action name="">
            <result>/WEB-INF/results/index.jsp</result>
        </action>

        <!--
        If the URL is hello.action then call the execute method of class HelloWorldAction.
        If the result returned by the execute method is success render the HelloWorld.jsp
        -->
        <action name="hello" class="com.nabisoft.struts2.demo.action.HelloWorldAction" method="execute">
            <result name="success">/WEB-INF/results/HelloWorld.jsp</result>
            <result name="input">/WEB-INF/results/index.jsp</result>
        </action>

    </package>

</struts>
4. Creating the struts.properties
The struts.properties file is another configuration file where we can set some struts properties. See http://struts.apache.org/2.0.14/docs/strutsproperties.html for more information. I have choosen to place this file at /WEB-INF/classes/.
struts.devMode=true
#struts.locale=en
#we don't want to show extensions
struts.action.extension= ,
struts.configuration.xml.reload=false
struts.i18n.reload=true
struts.custom.i18n.resources=global
struts.enable.DynamicMethodInvocation=false
#struts.enable.SlashesInActionNames=true
5. log4j configuration
The log4j.xml file has to be placed either in your default package or it can be placed into the WEB-INF/classes/ directory. Again I have choosen to put the file together with log4j.dtd into the classes directory.
<?xml version="1.0" encoding="UTF-8" ?>
<!DOCTYPE log4j:configuration PUBLIC "-//log4j/log4j Configuration//EN" "log4j.dtd">

<log4j:configuration xmlns:log4j="http://jakarta.apache.org/log4j/">

    <appender name="STDOUT" class="org.apache.log4j.ConsoleAppender" >
       <layout class="org.apache.log4j.PatternLayout" >
          <param name="ConversionPattern" value="%d %-5p %c.%M:%L - %m%n" />
       </layout>
    </appender>

    <!-- specify the logging level for loggers from other libraries -->
    <logger name="com.opensymphony" >
        <level value="DEBUG" />
    </logger>

    <logger name="org.apache.struts2" >
         <level value="DEBUG" />
    </logger>

    <!-- for all other loggers log only debug and above log messages -->
    <root>
       <priority value="INFO" />
       <appender-ref ref="STDOUT" />
    </root>

</log4j:configuration>
6. Internationalization / i18n
Internationalization is an easy job in Struts 2. We will simply create a global.properties file because we have defined it in our struts.properties (see above). global.properties is for the default language, for English we also create global_en.properties and for German global_de.properties files. Since I want English to be the default language global_en.properties will simply be empty. In this case you could also leave the file global_en.properties away but unfortunately I was facing some i18n issues. It seems that depending on the JRE locale struts chooses the corresponding "default"-locale. Offering an empty global_en.properties file solved my issue - it is enough for me as a workaround. All English descriptions will be in global.properties. For this tutorial it is enough to place the properties files into the default package.
submit=submit
your.message-label=Your message
welcome=Welcome to Struts 2!
error.enter.message=Please enter a Message!
submit=Absenden
your.message-label=Ihre Nachricht
welcome=Willkomen zu Struts 2!
error.enter.message=Please enter a message!
7. Creating the struts results (jsp)
Next we will create two jsp files in /WEB-INF/results/ which will be our struts result pages we have specified in the struts.xml.
<%@ page language="java" contentType="text/html; charset=ISO-8859-1" pageEncoding="ISO-8859-1"%>
<%@ taglib prefix="s" uri="/struts-tags" %>
<?xml version="1.0" encoding="UTF-8" ?>
<!DOCTYPE html PUBLIC "-//W3C//DTD XHTML 1.0 Transitional//EN" "http://www.w3.org/TR/xhtml1/DTD/xhtml1-transitional.dtd">
<html>
    <head>
        <title>Basic Struts 2 Project Setup</title>
        <s:head/>
    </head>

    <body>

        <h1><s:text name="welcome" /></h1>

        <p>
            <s:url id="localeEN" namespace="/" action="" >
                <s:param name="request_locale" >en</s:param>
            </s:url>
            <s:url id="localeDE" namespace="/" action="" >
                <s:param name="request_locale" >de</s:param>
            </s:url>
            <s:a href="%{localeEN}" >English</s:a>
            <s:a href="%{localeDE}" >German</s:a>
        </p>

        <s:if test="hasActionErrors()">
        <div id="fieldErrors">
            <s:actionerror/>
        </div>
        </s:if>

        <s:form action="hello" namespace="/" method="post" name="myForm" theme="xhtml">
            <s:textfield name="message" size="40" maxlength="40" required="true" key="your.message-label"/>
            <s:submit key="submit" />
        </s:form>

    </body>

</html>
<%@ page language="java" contentType="text/html; charset=ISO-8859-1"
    pageEncoding="ISO-8859-1"%>
<%@ taglib prefix="s" uri="/struts-tags" %>
<?xml version="1.0" encoding="UTF-8" ?>
<!DOCTYPE html PUBLIC "-//W3C//DTD XHTML 1.0 Transitional//EN" "http://www.w3.org/TR/xhtml1/DTD/xhtml1-transitional.dtd">
<html>

    <head>
        <title>Hello World!</title>
    </head>

    <body>

        <h2>Thank you for your message on <s:property value="nowDate" /></h2>

        <p>
            Your Message was:<br/><br/>
            <s:property value="message" />
        </p>

    </body>

</html>
8. Implementing the Action Class
Now we have to implement our Action class which we have referenced from within our struts.xml file.
package com.nabisoft.struts2.demo.action;

import com.opensymphony.xwork2.ActionSupport;
import java.util.Date;

public class HelloWorldAction extends ActionSupport {


    private String message;

    private Date nowDate;

    @Override
    public void validate(){
        if (message==null || message.length()==0)
            addActionError(getText("error.enter.message"));
    }

    @Override
    public String execute() throws Exception {
        nowDate = new Date();

        return SUCCESS;
    }

    public String getMessage() {
        return message;
    }

    public void setMessage(String message) {
        this.message = message;
    }

    public Date getNowDate() {
        return nowDate;
    }

}
9. Location of the required files
Please have a look at the two sceenshots above (one for Eclipse and one for Netbeans) to see where exactly all the required files are located. You could also download the preconfigured Eclipse project (configured to run on Tomcat 7) or Netbeans project (configured to run on Glassfish 3.0.1) and import it into your IDE. As you can see both in the screenshots and the preconfigured projects the i18n property files are placed right in the default Java package. The directory WEB-INF/classes/ contains the following files:
- log4j.dtd
- log4j.xml
- struts-2.1.7.dtd (shipped with the struts download)
- struts.properties
- struts.xml
I usually prefer to put *.dtd (here: struts-2.1.7.dtd) files somewhere on the local server and then referencing them there instead of referencing a remote server. In our case I have choosen to put the file struts-2.1.7.dtd into WEB-INF/classes/ and to reference it in the file struts.xml via "/WEB-INF/classes/struts-2.1.7.dtd" instead of referencing "http://struts.apache.org/dtds/struts-2.1.7.dtd" (see Step 3 ).
10. Running the application
To see the result of your application you need to enter one of the following URLs into a browser of your choice (your URL might be different depending on your project settings):
- Eclipse project: http://localhost:8080/BasicStrust2ProjectEclipse/
- Netbeans project: http://localhost:8080/BasicStrust2Project/
11. Download Source Code
Instead of creating your Eclipse/Netbeans project according to this tutorial you might prefer to download the preconfigured projects I offer. This might save you some time because you can import them into your Netbeans/Eclipse IDE and have a runnung example within only a few minutes (or even seconds). Make sure you have already installed Glassfish 3.0.1 / Tomcat 7. You should also have Glassfish 3.0.1 / Tomcat 7 added to your IDE.

I download the netbeans project it is run successfully in my system..Thank you very much..Hai, I need a help and detailed information of log4j and procedures to convert an web application into executable file which has to be in encrypted format for security purpose.Hi Sir, I am writing a small application where I read data from JSP and pass it to Action through Forms. I have created project in Netbeans 6.9 . It was all fine till i wanted to integrate it with Struts2 Jquerry plugin. It Shows below error: org.apache.jasper.JasperException: file:C:/Users/Jasmine/Documents/NetBeansProjects/WebApplication3/build/web/JQueryTrial.jsp(11,40) PWC6117: File "/struts-tags" not found org.apache.jasper.JasperException: PWC6117: File "/struts-tags" not found My previous JSP file as below ( when it worked fine) <%@page contentType="text/html"%> <%@page pageEncoding="UTF-8"%> <%@ taglib uri="http://struts.apache.org/tags-bean" prefix="bean" %> <%@ taglib uri="http://struts.apache.org/tags-html" prefix="html" %> <%@ taglib uri="http://struts.apache.org/tags-logic" prefix="logic" %> <html:html lang="true"> <head> <meta http-equiv="Content-Type" content="text/html; charset=UTF-8"> <title><bean:message key="welcome.title"/></title> <html:base/> </head> <body style="background-color: white"> <logic:notPresent name="org.apache.struts.action.MESSAGE" scope="application"> <div style="color: red"> ERROR: Application resources not loaded -- check servlet container logs for error messages. </div> </logic:notPresent> <html:form action="test.do"> <html:text property="name"/> <html:submit /> </html:form> <h3><bean:message key="welcome.heading"/></h3> <p><bean:message key="welcome.message"/></p> </body> </html:html> -------------------------------------------------------------------------- Now it is like shown below <%@ taglib prefix="s" uri="/struts-tags"%> <%@ taglib prefix="sj" uri="/struts-jquery-tags"%> <html:html lang="true"> <head> <meta http-equiv="Content-Type" content="text/html; charset=UTF-8"> <title><bean:message key="welcome.title"/></title> <html:base/> </head> <body style="background-color: white"> <logic:notPresent name="org.apache.struts.action.MESSAGE" scope="application"> <div style="color: red"> ERROR: Application resources not loaded -- check servlet container logs for error messages. </div> </logic:notPresent> <div id="div1">Div 1</div> <s:url id="ajaxTest" value="/AjaxTest.action"/> <sj:a id="link1" href="%{ajaxTest}" targets="div1"> Update Content </sj:a> <html:form action="test.do"> <html:text property="name"/> <html:submit /> </html:form> <h3><bean:message key="welcome.heading"/></h3> <p><bean:message key="welcome.message"/></p> </body> </html:html> --------------------------------------------------------------------------- Can you please look at the problem ad let me know where what is the link I am missing. I have included all the library files through Project--> properties --> Library. I dont think there is an issue due to that. Thanks in advance !!!